Building A Social Network in Wix | Part 11 | Adding A Custom Login Feature
- Michael Strauch (MPS)

- Jul 20, 2020
- 12 min read
Are you ready to add a login feature to your social network in Wix? Well, if so, my name is Michael Patrick Strauch and I'm bringing you part 2 of our 12 days of Christmas building a social network in Wix series. So we're actually on part 11 of the series, but part 2 of the 12 days of Christmas.
Last video, which was yesterday, I announced that I would be presenting to you guys an early Christmas present and giving you 12 new parts of building a social network in Wix, The Non-Coding Founder's Guide as my Christmas gift to you.
So just for that hit that subscribe button down below, if you haven't already. So you don't miss a single one of these uploads over the next 12 days, because they are going to be extremely value field. Drop a like down below, if you've liked this series so far and comment what you've enjoyed and what you're looking forward to, so that way I know how to curate my content for the next few days over this series. Also, if you haven't already headed over to wixtrainingacademy.com, click “ACADEMY” to access the code we use in today's video.
Adding A Custom Login Feature

All right guys, so we're here in our social network that we've been building out again. There's not true home page design yet. I'm showing you more the backend functionality things. Before we add some of the aesthetic field, we have added aesthetic field to the profile page and even the “My Account” page. But today what I wanted to do is something that's a little well, really what should have been accomplished a little earlier on, but there was a few components we needed to fill in in the social network building to get done before we added this, which is the login feature.
So we created a register feature, how people register for their account on the social network. Now we need a way for them to log in. So here's how it's going to go. There's two ways you could technically go about doing this. And I'm going to show you, one, has a little bit more customization and versatility over where you send them, the other one does not.
So there's this member's card, a member-like notification bar that I showed you at the end of last week's video and how I showed you how to edit a profile page in your social network from this bar. If we go to “Preview”, you can see that people have the ability to click the dropdown and they can click “My Account” or “Log out”. That option will also be available, if I click log out again. We’re in the profile or the preview mode. So it doesn't let me log out unless I'm on “Publish”. But if I log out, it would say log in right there. So that's the first method. And what would happen is when you click login, it would take you right here to “My Account” page, just like this. And this is where it would take you to once you log in.
Now in this video, I'm going to show you how to create the custom log-in lightbox, which you can to redirect the user to any page after login. I am also going to send the user to this my account page in the video, but I'm going to show you how that can be altered and changed from the lightbox, but not from this profile navigation bar here. So it cannot be accomplished from this, but it can be accomplished from the lightbox.
Adding a Lightbox
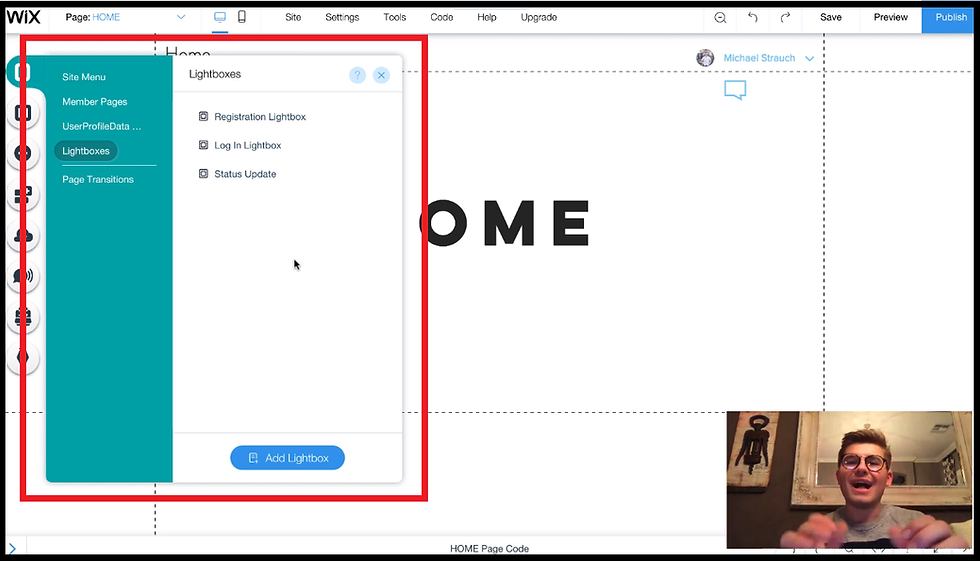
So if we go back and I go “Back to Editor”, I already added a little login button here. What we would do is we'd come in here, we'd go to “Site Menu” pages. We'd go to “Lightbox”, also alert, this applies to pages too. So if you'd prefer to build a login or registration page, this exact same process applies. You use the exact same code and you use the exact same elements, the difference is instead of designing a lightbox, you design a page. I've gotten a lot of questions asked about that. So there's no need to confuse the two. They're not two different ones. It's the same exact functionality, same exact concept, same exact process, but a different page instead of a Lightbox, I'm going to use the lightbox in this example, because that's what I've done in all of my recent videos to show you how to use the lightbox method. So that's how I'm going to deliver it to you.
So I've already gone in here and created my Lightbox. I could recap to show you how to add the lightbox features first. I went in here to “Add” over on the left hand side. Once I got into Add, I simply scroll down to “Lightbox”. I picked a random lightbox on here, I believe I picked this one right here. And then when I did that, I had this all up here. And then I just deleted that content in the middle and added a box.
Now, after you add the box again, the aesthetics, the design of your lightbox really does not matter. That comes down to your preference, how you want to design. What I want to show you is adding this functionality right here, adding these components, because this is the important part.
Adding Input Fields
So after I added the box, added the aesthetics, add this little logo, align the little log-in text. What I needed to do was I needed to add input fields that allowed my user to actually log in just like the registration back in part 5, I think that's when we covered the registration part of building a social network. It's the exact same concept, except we change one word in the code from register to log in. And it's literally that exact same process.
Input Settings

So what we do is we go in to “Add” over here and then we have to make sure our, Wix code tools are activated. So we'd come up here to “Code” and make sure developer tools are on. You can see they're on right now because it says, turn off developer tools. If they're not, it would be a blue button say, turn on. You made sure they're on. So that way you get access to these.
Then what you're going to do is you're going to scroll down to “User Input” and you add any one of these texts input fields up here. I believe I added just this “Level of Education” one. Just like that, and I'm not going to add another one, but what I did was I added that one and then just copy and pasted it for the password.
Once I did that, if we double click the input that we just added, you're going to make a few alterations and I'll show you first things first, you're going to want to change the placeholder texts to one email because they need their email and their password to actually log in. So you're going to want to change the placeholder text to “Email”, and you're going to want to change the type up here to “Email” as well. So that's all you have to do and you have to make that a “Required-field”, obviously because the user needs that in order to log in and then you're set for that user input.
Then again, you just copy and paste it down. And then what you're going to do is you're going to click “Settings” again, this time you're going to change the placeholder text to “Password”. So you're going to change it to password instead of email. And you're going to change the type to password by changing the type to password. It does the black little radio dots, so it blurs out the password as you're typing it. And it registers as a password when the user clicks log in. So that way it pulls from the Wix CRM data to make sure that corresponds with the same information you use to register.
And then again, make sure that is a “Required field” right here where it says required. So that way your user can actually log in because if they don't put a password, they're not going to be able to log in. They need to use the same username and password they created when they registered for their account.
Adding a Button
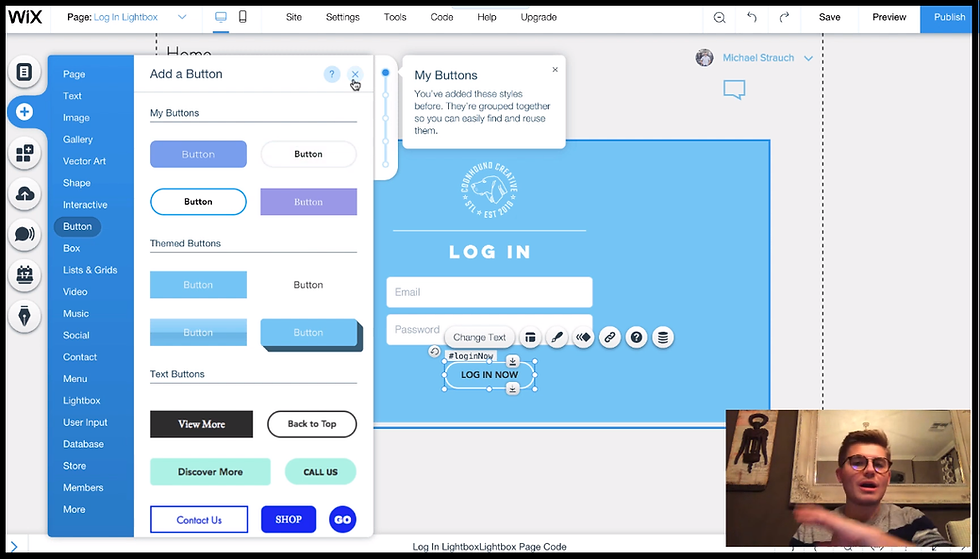
After that is done, I added just a button. So I went to “Add”, and then I came down here to “Button” and then I just added a button. It does not matter what kind of button you add. What matters is that we have it connected here. And what happens is we don't actually physically connect it to the data because now I'm going to show you the next part of this, which is the coding part.
So we don't actually have to physically connect any of these fields to any data quite yet, because we're going to do it through the code. So now to open up the code and this is where the button comes into play as well. We're going to just click down here. You'll see the page code manager, you'll click open. And then my code is already in here. So you can go to the Wix Training Academy and then log into your account or sign up for account by going to Academy, free account and entering your details, literally the same process that I'm building out for you here.
If you're logging in, or if you're registering, same process that we use in the registration. And then you're going to see a little tab on your dashboard page under your profile card that says code snippets. And you could go in there and get the log in cod and that's the same code we use in this video.
Now, if you want to replicate me exactly and use the same field names that I used here, what you're going to want to do is you're going to want to open “Tools” and you're going to want to open a “Properties” panel and you're going to want to make sure you can see when I click on this, the little hashtag right here, “#loginEmail”, that's managed by this ID here. So whatever you put into the ID here is what this little hashtag is going to be.
These hashtags correspond to the code. This is how the code identifies what fields are what in, what it submitted. So if you want to be exactly like my logging feature, which I would recommend, it's easiest. You want your email to say log-in email, always make sure the second word is capitalized. The first letter of the second word is capitalized, so “loginEmail”. For password, It's just “loginPassword”. And then for the button, it's just “loginNow”. And if you use those same exact ID names in your fields, then you don't even have to change a single bit of code in here other than this Wix location too.
So now that we have the code open, you can see that everything is all set and you can see that this login now. So if you see “$w.onReady (function{)”, and then you'll see “#loginNow”. So this is an on click function for this button. And what happens is it pretty much says when this button is clicked, let email “#loginEmail”, whatever you name that field, right there is what's going to go right here. And then when “#loginPassword”, again, whatever you name that password field, that ID is going to go right there.
When those are filled out with “.value”, the values that were entered in there, it prompts “Wixusers.login”. So instead of dot register, like we used in the registration tutorial, they're going to log in instead of register. And it says, “.then” go to “wixlocation.to”. And this is where you send them to whatever page you want.
So this is when that customization comes in. When you get to pick where your user goes. So in the profile card that I showed you up here, it only goes straight to the my account page. But when you do a custom login lightbox, you have control over where your user goes. So technically speaking, you can redirect them to their profile page directly from this lightbox.
Redirecting
In this video, I'm going to show you how to direct them to the, my account page. Just like the notification button does that, little notification bar with your name at the top would redirect your account in order for you to do that, it would be /account/my-account. Let me show you how I found this little piece of page code. So it shows where to go first off. It's always going to be a forward slash here. The first little character after our quotation mark are error marks is going to be a forward slash, this designates that it's a page on your website. So that's the first things first.
Next we have to figure out what page we're signing that to. The way we do that is we go in here to our pages and then we determine what page we want them to go to. In my case, I want them to go to the, “My Account” page. So we're going to click on these three little dots, and then we're going to click on “SEO (Google)”. Once you do that, it will pull up right here. “What's the page URL?” So in this case, you can see it's has /account/my-account that is the page extension.
You don't put your full URL in here. You put the page extension, the code recognizes what URL it is assigned to. So it recognizes what website and domain name it is because Wix is hosting it. You need to put the page extension. So you need to put that after whatever's, after the URL that forward slash and whatever that is, that's what you need to put in those little error marks in the code. That's the page that goes to again, in my case, I'm sending them to the profile, the my account page. So it's /account/my-account and if we go back to the code, we can see if I pull the lightbox back up, “Log In Lightbox” it's forward slash right here. I'll highlight it for you /account/my-account and that's the page extension.
So what happens is after the user inputs, their email inputs, their password, and clicks that button. As soon as that button is clicked, that “Log In Now” button, it will redirect them to their, my account page, which will log them in. And once that happens, they have access to then update their profile. We've seen the my account page. We built that, not in the last video, not yesterday, but last week's video. And I showed you how to add to my account page, how to add the, edit the profile, all that good stuff.
So now that is how you add a custom feature for your social network. I gave you two methods there. You can use either the straightforward, just Wix’s pre-made members area log in button that takes them directly to their my account page in only my account page, or you can build your own custom login feature here with a lightbox or a page, but have customization over where the user goes. Once they click log in, instead of only going to the my account page. So you can have them go to the profile page as well.
So now that we've got that done in the code is set, let's press “Publish” and test it out. So we're going to click “View Site” right here, and then once we're viewing the site again, I already added a little link right here that links to the lightbox.
So if I click “LOG IN”, It should prompt the lightbox. And now what I'm going to do is I'm going to log out of here. So I make sure I'm completely out, for you guys can see how this works. So I completely logged out of the site. I'm going to click the “LOG IN”, and now I'm going to use the same details that I use to register, but now to log in.
So I'm going to go ahead and type my email out, and then I'm going to enter my password and I'm going to click log in. And there we go. We are redirected to the my account page just as I set in the code /account/my-acount and that's where it directed me from this point.
We now have the ability to edit our personal, my account info or update our profile. And what we can do after that is we could even add a button that can say, take me to my profile or back to profile. That will take them to the unique profile page. Like we built out, not last video, not yesterday, but last week's video. And that's where they can access their profile. And they could access, their, their feed and access their public like preview information and their profile picture, background, all that good stuff they're handle. But this is the backend, so this direction, right to the backend. And I wanted to make sure I showed you how to add that, I know that was a very big question at hand.
Conclusion
I hope this video answered it. If it did, drop a thumbs up down below, don't forget to comment if you have any questions and comment, what features you would like to see in this social network series over the next now 10 days. So that way I can make sure I curate some of the content to hit some of those immediate needs. All of you have, because that's important to me again, this is my gift to you the 12 days of Christmas building a social network in Wix, 12 new parts for you to utilize this December.
I hope you love it, I hope you guys are enjoying it. Hit subscribe button right down below and turn the bell notifications on. So you do not miss any of these uploads over the next couple of days, especially since they're coming out right back to back. Sometimes YouTube is algorithm, it doesn't throw it in your subscription box right away. So I want to make sure you've got them and you don't miss the episode. So hit that subscribe button and hit that bell notification on next to it.
Last but not least head over to wixtrainingacademy.com, this is where you can access that login code. So click “Academy”, if you're brand new and you haven't signed up already, it's completely free. Again, that's free access to code. And then obviously log in, if you are a current member and you can access the code under that, my code snippets tab, as you guys have done before.
Guys, that's it for today's video. I hope you've enjoyed it. I hope it's been helpful. I look forward to coming back at you tomorrow with our 3rd episode of building a social network in Wix in the 12 days of Christmas. Again, this was part 11, but tomorrow will be part 3 of the 12 days of Christmas, physically part 12 in the series.
If you haven't seen the rest of the series videos, click the Building A Social Network in Wix playlist right now, as it's on the screen, as we're finishing this video. Thank you guys again! And I will talk to you tomorrow.


محتوى الفيديو مثير للغاية حول كيفية إضافة ميزة تسجيل الدخول المخصصة في شبكة اجتماعية على موقع Wix! يبدو أن إنشاء هذه الميزة سيحسن التفاعل بشكل كبير ويسهل على المستخدمين الوصول إلى حساباتهم. بالنسبة لأولئك الذين يتطلعون إلى بناء شبكة اجتماعية أو منصة مشابهة، يمكنني أن أوصي بموقع www.mostbet-mad.bet لإضافة المزيد من التفاعل والمزايا لاهتماماتك الشخصية. الموقع يوفر لك بيئة رائعة لزيادة الفرص وتحقيق النجاح في مجال الرهانات، مما يجعل تجربتك شاملة وممتعة!
EPS Machine EPS Cutting…
EPS Machine Eps Raw…
EPS Machine EPS Recycling…
EPS Machine EPS Mould;
EPS Machine EPS Block…
EPP Machine EPP Shape…
EPTU Machine ETPU Moulding…
EPS Machine Aging Silo…
EPTU Machine ETPU Moulding…
EPS Machine EPS and…
EPS Machine EPS and…
AEON MINING AEON MINING
AEON MINING AEON MINING
KSD Miner KSD Miner
KSD Miner KSD Miner
BCH Miner BCH Miner
BCH Miner BCH Miner
Hello if you have never played maybe now is a great opportunity to start playing here - https://1win-freespins.in/ a great site to answer and have a great time here I found everything to relax great games beautiful and nice interface everything works smoothly so you come and play here because it is really interesting