Building A Social Network in Wix | Part 13 | Adding A Liking System with Wix Code
- Michael Strauch (MPS)

- Jul 22, 2020
- 14 min read
llo YouTube, do you want your users to be able to save likes and like content on your social network? If so, join me in today's video as I uncover part one of creating a custom liking system for your social network. Yes. That means people can now like content and that content can then be saved in their likes under their profile.
So if you've been following the series so far, we've covered creating profile pages, creating status pages editing profiles, and even adding automations like emails into the social network. If you haven't gotten caught up in the video in this series so far, click the card that I'm about to display here on YouTube. So you can catch up because all of the previous videos are required in order to move on to this step in this series.
If you are caught up and you are loving the content, make sure you hit that subscribe button right down below and click the bell notifications on. So you don't miss an upload over the next couple of days here as I'm presenting you. My early Christmas present of the 12 days of Christmas, uploading a new video, a new part of this series each day up until Christmas. So don't forget to hit that subscribe button like the video. If you'd like this series and comment down below what you'd like to see in the series over the next couple of days, I can tell you liking commenting. These are all on the schedule to hit over the next couple of days. So I hope you're ready for it.
Don’t forget to head the wixtrainingacademy.com click Academy to register. This is where you can access the code we use in today's video. So it's important that you register. If you haven't registered already, it's completely free. That's where the code is for today's video. So guys, let's head into our editor.
I'm going to ask you to as best as you can follow along with what I am doing. There's a lot of moving parts in this in particular video. It's not overwhelming. It's not super difficult, but just follow along and follow step by step and we'll go through it together.
Adding A Liking System with Wix Code

So first things first, we have our user status database. We've created this database. One of the first ones we did and I went in here and I actually added three different statuses here in sunk it to the live database, just so we had some sample statuses in here.
So this has already been created along with our status page. Now I went ahead and created a dynamic page off of the user status, his database, just by simply clicking this gear icon and then add dynamic page. That page is right here. So this shows one status out of all the statuses. And we're going to use this in particular to reference in today's video, which is adding the lightning system. I'm going to show you off of one element, one status, how to actually add the like button, add the code in for the like button. So that way you can duplicate it across your other status pages and you can see how it works and how it functions.
Creating A New Database
Now that we have our statuses database, we have our user status database. We have our users, user statuses dynamic page. We now have to create a new database. We're going to call this database. Once it pops up, we're going to call it ‘likes’ because this is where all of our users ‘likes’ are going to be stored. And then what's this database collection for we're going to choose custom use. And then we're going to set custom permissions. So who can read content from this collection, the site member author. So this means whoever likes the content is the person that gets to see their liked content. So the site member author gets to see their like content who creates it, the site member. So any site member can, can like a piece of content.

Anyone that's registered on the social network can like it, who can update it, the site member, author's the only one that can update their likes and then who can delete it. We'll also choose site member, author. You could choose admin for that as well, depending on how your social networks set up. And then we're going to press set and create collection.
Once that happens, our database is then going to be set up and we now have our a while we would have a blank database here, but I already created this in my practicing when I was, you know, going through and actually making sure this is all working properly. So what you're going to end up doing is to get this owner field, which you need open. You're just going to go over here to the visible fields. You're going to click that. And then this owner, when you originally set up your database, it's not going to be open like this. You just have to check that button on. You could see if I check it off. It disappears when I check it on, it appears, just make sure that box is checked on.
Creating New Field

Next, you’re going to have to create a a new field. Now I, again, already created this field, but let me show you how it's done. So you would just simply click add field and you can name it, whatever you want. I chose like content for the sake of this. I'll just say ‘contentLiked’. And then you just add your field name. Now we're going to use a new type of field on our, excuse me, a new field type. This is one that we haven't used before, but we're now going to utilize. So you're going to come in here and it's not going to be anything under here. We're used to all these different field types. We're actually now going to use a reference field.
So this field will actually reference once you click reference it, has you choose what collection you're referencing. So we're going to be referencing the user statuses collection. So the user status is collection is where our statuses are held. So this in particular database is going to hold all of the referenced statuses. So all of the liked statuses and that's where it's going to be held. The owner is so designates the correct owner to that in particular liked show, whatever that logged in owner is, is whatever content is liked. And that's where that references comes into play.
And we're just going to press add. So again, I'm going to delete this one because I've already done it right here for the liked content one. So that's the process of adding that. So now once we have our likes database set up, what we can do is we can then go into our user statuses dynamic page. So this is our dynamic page on here. You can see, I have linked our our data just to our regular data set here, just like we did on our statuses page.
Adding A Like Button
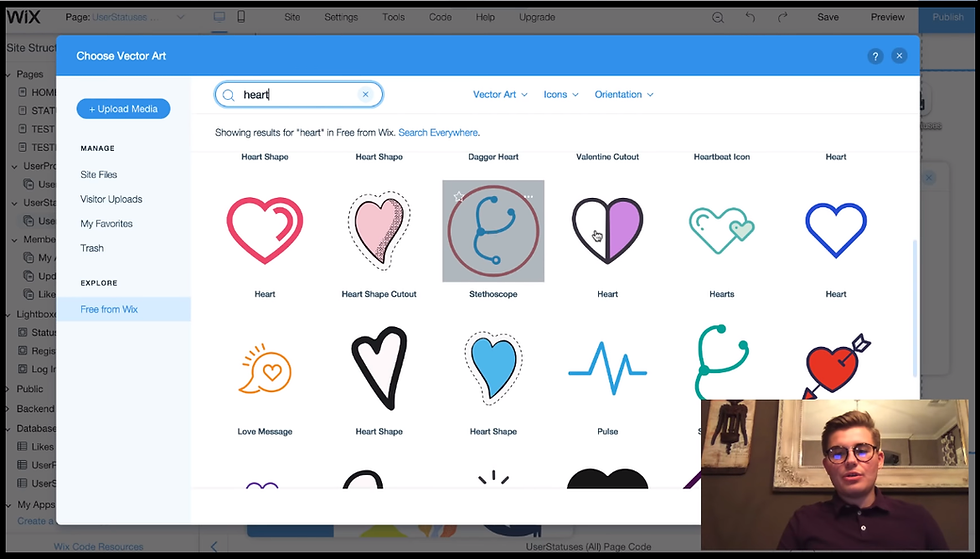
So it's just linked up to our status data. But now what we have to do is we actually have to add a like button. Should we have to add a like button? You can add whatever image, whatever button you want to add for your liking. I am going to use an icon. So I'm going to go to add, and then I'm going to go to vector art. I'm going to go to icons and then I'm going to go. I'm going to get a heart icon. Use, use this puppy right here. Going to shrink it down, go ahead and shrink it. Then I'm going to drop it down here, just like that. I'm going to change the color here to red. So I'm going to change the color like that.
Now, this is going to be the unliked look. So what I'm going to, I'm going to change the ID of this image. So whatever that hashtag is to like, just simply like, okay, so this button, when clicked means it's going to be liked, right? So it's going to be blank right now. So we have to add another button for when or yes, for when it is liked. So now what I'm going to do is I'm going to add another button for when it's liked to show the blank. Heart means it's unliked, but we need to add a full heart to show that it's been liked. So now I'm going to change the vector art. I'm going to come back in here. I'm going to type part again. And this time I'm going to get the full heart right here, and it's going to be red. I'm going to change the idea on this one to content liked.
Then you're going to put it over this, except what's different is we're going to change this one to hidden load because you don't want this full heart to pop up. If someone hasn't liked the content yet. So we want it hidden on load. We're going to click that. And now if we click off, it'll show the unliked version. So now once we have this here, what we have to do is we have to add the code to actually make that liking process happen. But before we do that, I have to show you where our likes are going to go. So where can we access our likes to see what content we've liked before?
Well, if we go back into our member pages, I added a ‘Likes Page’. So what I did was I simply went in here to menu pages. Then I went to member pages and I just clicked, add a new page. And I added likes after I did that. I just simply brought this text in that said liked. And then I added another repeater like we have on our statuses page. And very simply I just added a data set to add a data set. I went to add, and then I went down to database dataset, click that. And then once I added the data set, I just double clicked it and changed the dataset. So this is a key point here. So this dataset needs to be connected to likes.
So this is going to be our reference dataset. So this is going to be connected to likes. I'm going to make the dataset name, likes dataset. You can change that to whatever you'd like. The mode is read-only because there's not going to be any altering of data on this is just going to be reading through and number of items to display. I just put a thousand. You could put as many options as you want here, show as many likes as you want to display.
Again, I just put a thousand that number's completely and totally up to you and then you're all set. After you do that, what you have to do is you actually have to link these items in the data, in the repeater to your dataset. So we're going to click this data button and then you're going to change liked content.
Connecting The Reference Field
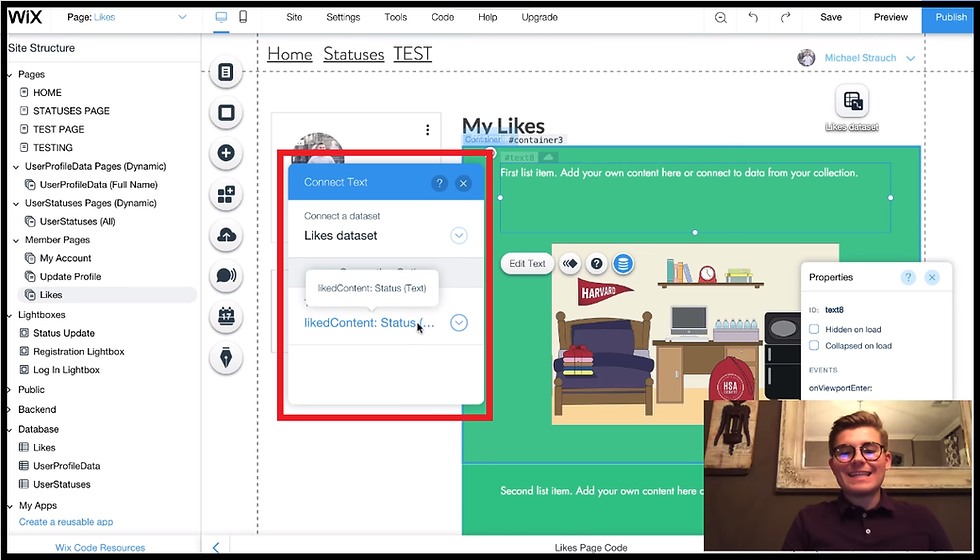
Okay guys so now we're going to connect it to our actual correct reference. So, we want it connected to status the text. So we want the liked content status because that's our reference field. So we want to connect that first and then you can see the connection has been made when it turns to green. And then I'm going to exit the properties panel. We're going to connect our image and we want our image to connect to liked content image. And we just simply click image there because that's our reference field in the database. So we want that content and we want it connected to the image.
So now we've got our, my likes page set and built out. It was very easy to do. You can see you just add the data set and make sure you make it the likes database that it's connected to. And then you just add these items in there all reference items. So these items are dynamic. They will change based off of what's been liked. So if nothing's been liked, nothing will be added or changed in here in my likes. But if you liked something, it will be added and changed right here in my likes and whatever you liked will be added in here.
Once you have that done and you have your, my likes page built out and you change the design and do all that to whatever you'd like it to be, we're going to go back to our user statuses dynamic page here. And now we're actually going to add the code for the page that makes the whole liking system happen.
Adding The Code

So we're going to open our page code code handler down here at the bottom, and then you can see I've added the code in here. Okay. This code can be found in the Wix Training Academy under code snippets. So go get your account on there or go log in if you haven't already. So we have import all of the data here. So import Wix users from Wix users in port, Wix data from our state and in port, Wix location from Wix location, these are standards for importing all these for, from the members, from the data, from the database and from location.
So it knows where to go next. But after that, you're going to see something you're going to see SWR dollar sign w dot on ready. And then it says, which users dot current user logged in. This says that the current logged in user is going to see in this case, like, remember when we opened our properties panel and we named the ID for this unchecked, unliked image, like that's the ID. So when the user's logged in, they're going to see like.show. They're going to see this.
If they're not logged in, they're not going to see this liking option because the user has to be logged in, in order to like content. So if they're not logged in this heart is going to disappear. There's not going to be anything there. If they are logged in, they're going to see this heart and they're going to be able to click it.
So the next step of this says our function. So this is our actual function in order to get this again, you have to make sure in just a pre advisory here, you guys can name your your IDs, the same as I named them. So like, and then the other one was content liked. And that way, and you can name your database the same and database fields. So that way you don't have to change anything in the code. But if you do change name, this button, something else, you have to change it here. So mine is like, so it says like dot show. And then again, it says like that hide if the user's not logged in, but that's my field ID.
If yours is different, you have to make sure you have the corresponding one for your particular like button there. And then when we get down here, this is our export function. So this is our on click function. So when this open heart is clicked, what you have to do is one, you have to make sure you go in here, you click this. And then over on your properties panel, you're going to see an enclave function. So if we go here, I'm going to just copy and paste the data from in here. And I'll show you how this is done.
If we go in here, we'll click our like button and then we're going to see on click. You're going to want to click that little plus button, and then you're going to hit enter. When you do that, your function is an added to the code. After that, I'm just going to copy and paste the pre-existing code that I have back in here. We see a couple of things. We see the like function is added to the enclave function is added, which means when this button is clicked, the following happens. So the rest of this code is carried out. What does the rest of this code say? Well, it says Wix data dot insert likes. So the name of your database, your likes database goes here. My database name is ‘likes’. So I added lights here, whatever the name of your likes database, the one with your likes reference field. That's what goes right here.
It says, insert in like show when this button is clicked, insert show, insert, whatever they're liking into. And then this is where you put mine is liked content. If we go back to our database, what this is right here is it's the name of this field. It's the name of your reference field. You can find out the field name by clicking these three little dots manage field, and then you could see field key. Whatever this field key is, is the is the same line of writing is the same key that has to go in right here. Again, mine was liked content, and then you made sure that yours corresponds again, you may have a different field name there, just make sure it's changed to accurately represent your field name. And then it says dollar sign w and then it's whatever. The next part, this section right here is the dataset on this page. So whatever this data set is, I have mindset to user statuses.
Now it's not this right here, not this white words, it's the ID. So just like our elements, we have to highlight this and then change the ID, whatever the ID of your dataset is on this page. It is what has to go right here in, in this dataset as mentioned, we want it's pulling from the user status is collection. So we have that there, we idea to whatever that ID name is. We put it right here, hashtag and then whatever the ID name is, it says get current item. So whatever item is displayed on this page is what's supposed to be put into that reference field. So it inserts this current item into the reference field.
After that, you're going to see a dollar sign w and then it says show. So again, that's where that hidden on-load full heart is, comes into play now. So once that button, once this light button is clicked, what will happen is that current button that full heart will then show so dot show. Again, mine was named content liked whatever your button name was is what you have to put right here. Again, mine was content liked in that's my full heart. So that'll show. And then what I have is this, like the open heart we want to hide. So we don't want the open-heart anymore there. We want that button to be hidden because it is now light content. And we want to accurately represent that it's been liked with that full heart. And that's exactly what the code States that's exactly how it works.
So now what I'm going to do is I'm going to go ahead and test it out with you guys to show you how that process works. If you have any questions regarding the code, please don't hesitate to write a comment down below better yet, go into the Wix Training Academy community tab, and write a question in the forum and vote myself in our Wix Training Academy community can help you out with that. If you have any questions regarding it. So guys, that's how you add the liking system. Now I'm going to test it for you to make sure it works. If we have the same error I've been having, I will do a second part of it, but let's check it out and see
So I'll click publish there. We'll go to view site. Okay. So you can see I've already logged in and we're going to go to this test page. This is our user status is page or excuse me, we're going to go to our status page. I'm going to click view full status. This will bring us to our dynamic page. So now we're now on our dynamic page. So if I click this like button, what should happen is bingo. So our content has now been liked, and we can go check our likes, my likes page to make sure it has been added. So if we go to my account, we will see likes, we'll click that. There we go.
Look at that, just like that our content has been added. This is our liked content, just like we added in the my likes page when we were designing it out. So this is our our, a repeater right here and the proper liked content has been added to the page. So just like that, that's how a liking system is built and how it's added to my likes page.
Conclusion
Guys, if this video helped you out drop a like down below, don't forget to comment your feedback on this video. And also what you'd like to see upcoming in the series and hit that subscribe button and turn those bell notifications on. So you don't miss the rest of the parts of this series. You're going to want to watch them.
This is just the beginning of our more advanced Wix code stuff. And I just showed you how to add a liking system, your website. So that's pretty awesome to access that code again, guys, go to wixtrainingacademy.com, click that Academy button to register for free. If you're already registered click log in and go to code snippets on the dashboard page to access that code.
I appreciate you guys watching this video. I hope it helped you out, and I'm glad you've enjoyed so far. Thank you guys again, catch you on tomorrow.


JJMusicSales is a gem for music lovers! Not only do they offer a wide range of quality musical instruments, but the free music lessons https://jjmusicsales.com/ provide are a huge bonus. It’s perfect for beginners and pros alike. Shopping here is a great experience every time. Highly recommended!
ऑनलाइन कैसीनो में खेलने का https://mostbets.net.in/ अनुभव अविश्वसनीय था। यहां की गेम्स का ग्राफिक्स और साउंड क्वालिटी बेहतरीन है। बोनस और प्रोमोशन्स भी आकर्षक हैं, जो खेल को और मजेदार बनाते हैं। साथ ही, ग्राहक सेवा तेज और सहायक है। पेमेन्ट विकल्प आसान और सुरक्षित हैं। इस प्लेटफॉर्म ने मेरी उम्मीदों से बढ़कर प्रदर्शन किया। यह मनोरंजन और रोमांच का एक परफेक्ट संयोजन है!
I want to tell you about a really good site where you can start winning real money just by playing slot machines online in the United Kingdom - https://www.casino-sistersite.co.uk/playfrank/ . I'm very happy to have found this gaming site, and I recommend it to you! Have a great day and good luck playing here.
Hello, my name is Emma. Frumzi Casino offers a wide selection of games that kept me entertained. The bonuses were rewarding, and the site is easy to navigate. I appreciated their quick customer support and smooth payments. I’d recommend Frumzi.