How To Create Corvid Databases | Corvid by Wix Tutorial
- Michael Strauch (MPS)

- Jul 8, 2019
- 6 min read
Updated: Aug 6, 2019

Hey Wix Nation, Michael Patrick Strauch (MPS) here from Wix Training Academy. In this article, we are going over how to create databases in Wix.
Wix has added some new elements to their databases. Also, they have made dynamic pages integrate with many Wix applications.
Every great website starts with a solid foundation. Having a solid foundation is the key to moving towards website success. Using Wix makes it easier for everyday business owners and entrepreneurs like you to innovate.
Step 1: Activate Wix Developer Tools
First things first. To start creating your database you will need to enable corvid. Inside the Wix editor:
Select Dev Mode from from the menu bar
Press the Enable Corvid button

Overview
Once you open up the Dev Mode and enable developer tools, it opens up a whole new world (Aladdin pun not intended). In this article—before we go through the rest of the steps to creating a database—I will quickly go over the different elements that show up after enabling the Corvid options.
Maybe I will do a full blog post about each option later.
The Properties Panel
The properties panel allows you to work with elements in the Wix editor, including any aspect you can imagine. Yes, every aspect. You can add Corvid code to the header, footer, and even the page itself.
If you accidentally closed the properties panel, it can be reopened in the toolbar options. You can also right click an element on your page and select view properties.

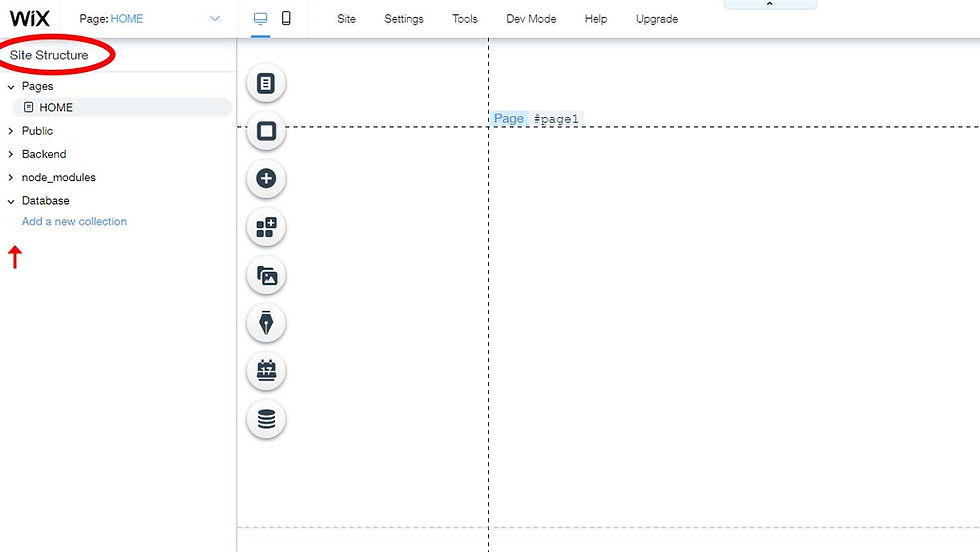
Site Structure
The site structure contains:
pages
Public code
Backend code
node_modules
Database
You will see all of your pages, your public, and backend codes. If you have any API integrations, you will likely be utilizing the public and backend codes, as well as web modules. Under that, you see the database.
The database is where you store customer information. It's where you store data that will display on your dynamic pages. It's also where you store member information.
If you are creating a site with members and member profiles, it's essential to know that databases and dynamic pages can help bring your site members a custom experience.
If you want to learn how to create databases—get used to the site structure menu. It will become your new home and soon enough, creating databases and dynamic pages, will feel like a walk in the park.

Opening and Closing The Site Structure Panel
You can get rid of this site structure here on the left by clicking the arrow button as shown in the image below. To open it back up, click that button again. It will open it. This can help you get a better view when designing pages or working within the site structure.

Page Code Manager
This is where your code will be stored, written, and edited. Coding has a steep learning curve and can be a challenge to even the most dedicated Wix user. If you are struggling with the code on your page or site, be sure to reach out. We have a team of dedicated Wix professionals.

Creating a Database
Now that we have gone over the options that are inside Corvid, let's dive into creating a database collection!

What is a Database
According to Wikipedia- "A database is an organized collection of data, generally stored and accessed electronically from a computer system. Where databases are more involved, they are often developed using formal design and modeling techniques. "
Databases and the collections you keep in them help you keep track and organize your data more efficiently. They also allow you to create dynamic pages based on a single design. Pretty great if you ask me.
What might we store in a database?
Many people as well as the Wix community are always coming up with new ways to utilize databases and the collections stored inside them.
Some types of collections we might keep in our database include:
User import forms
Contact forms
Lead evaluation forms
budget forms
member information
profiles
pictures
images
The list goes on and the possibilities are truly endless!
Creating a database and storing information on it is a critical part when creating custom Wix websites. If you are not using and implementing this kind of data your customers might be missing out on a more full experience.
Step 2: Use a preset or custom?
After going over some general information on what database collections have to offer you will come across this screen. I highly recommended you start from scratch. The presets can help you start a group quicker, and some of them come with dynamic pages already set up—but if you don't understand the basic principles of creating dynamic pages and databases—it doesn't help in the long run. So, for now, I recommended you select the "Start from Scratch" option.

Step 3: Naming a Database
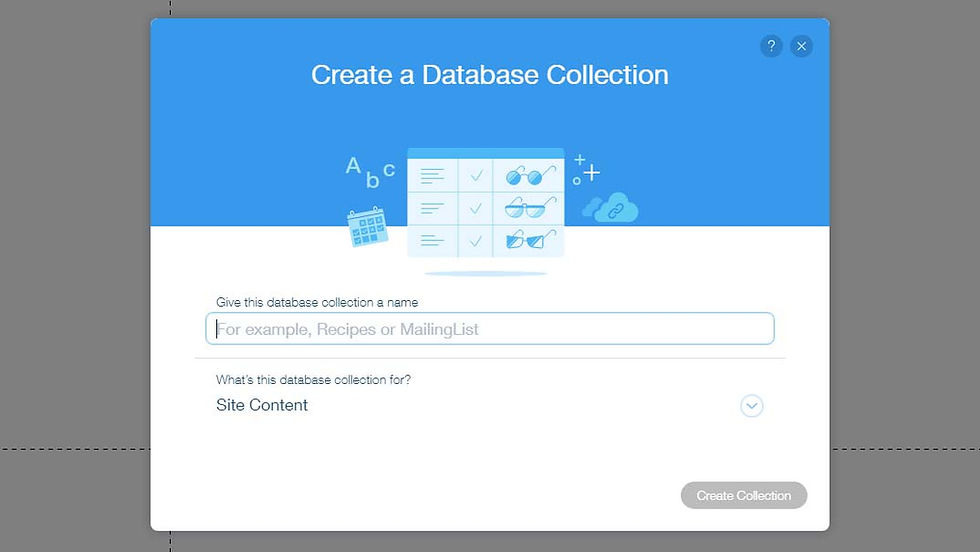
However you choose to name your database collection doesn't matter as long as it's something you can remember and it reflects the information you plan to store here. That way, when you use the name of the database in the code, it's easy to remember.
For instance, if you are creating a database for member profiles, your database collection name might say MemberProfileData. Notice how I didn't use any spaces? It's all one phrase here—there are no spaces allowed and this is how it will be seen in the code.

Step 4: What is the database collection for?
After naming your database collection you will be asked the question: What's this database collection for? This is a very important step. This is where you set up the permissions for your database. Depending on what you choose here will affect who can view the data.

5: Database Permissions
There are several permission you can assign to your database collection. Basically, this means who can access your database collection and what are the requirements for accessing your database collection. I will outline the basic uses for each type below. Maybe I will make a blog post in the future with further detail on each individual permission.
Site Content- means anyone can view the data from this collection
Form Submission- means anyone can submit data to this collection
Member-Generated Content- means only members can submit and modify content in this collection.
Members Only Content- means only members can view data from this collection
Members Only Form Submission- means only members can submit data to this collection.
Private Data- is a little different. Private data means only admins of the site can see this data. So if you had multiple employees running customer service or any other feature on your site you could create an admin dashboard. Meaning, your employees can have access to specific data that you authorize them to have and nothing else.
Custom Use- means you have all the versatility to custom create your permission exactly how you prefer.

6: Adding Fields
Adding fields to your database collection allows you to add a number of different types of fields. There are several different types of fields and some careful consideration should take place when choosing which type of field to add to your database collection. Making a plan for you site before hand is key and fully understanding each field type will help you a lot.

Field name
Naming your field is similar to naming your database in that, as long as you're able to keep track of the name and it reflects the data being stored is about—you are good to go.
Field Key
The field key is a reference that you utilize in the code.
7: Field Types
There are several different field types to discover. Each one implies different elements for separate use cases. I've outlined all the field types below:
Reference
Number
Boolean
Date and time
Document
Image
Media Gallery
Rich Texts
Tags
Time
Url
Video
In the future I will most likely create a blog article about each of these fields. Just so this article doesn't reach extreme lengths I will let you know that each of these fields can be chosen and utilized in your database collection.

Remember when I mentioned that building a solid foundation was the most important step. Well, I was serious and the same applies to your database collection.
Having a solid understanding of database collection is essential to making a website that is truly custom and versatile. Consider the purpose of the collection you are creating before you dive in.
If you want to continue learning about this process check out my article titled:
Click the link. This often is the next step.
Reading this article and realizing you'd like to save some of your time, stress and frustration? Don't worry, we get that a lot! If you'd like to work with our team on getting your development project off the ground, click here to submit your project request.


Mr Flip navigates vibrant, chaotic, and charming settings by jumping, tumbling, and flipping. Every leap requires timing and accuracy, and one flawless leap might give you the appearance of invincibility.
That actually sounds really helpful! I’ve been struggling to figure out how to target the right keywords and show up in local searches, especially since most people are just looking for brokers near them. I’ll definitely take a look at the page you mentioned—those tips could be exactly what I need to get my website noticed and bring in more clients. Thanks for sharing!
Absolutely, SEO can make a huge difference for mortgage brokers. There’s actually a page called Mortgage Brokers SEO that’s specifically tailored to this industry. It covers strategies like optimizing for local searches, targeting the right keywords (like “best mortgage rates” or “mortgage brokers near me”), and improving your site’s visibility overall. You can check it out here: https://www.seologist.com/industries/mortgage-brokers-seo.html. It’s packed with tips to help your website stand out and attract the right clients
I’ve been struggling to get my mortgage brokerage noticed online. There’s so much competition out there, and I feel like my website is just getting lost in the mix. Do you think SEO could actually help with something as niche as this?